Cloud storage has changed the way we store files. I can upload a document from my laptop, open it on my phone later, and share it with someone without carrying a flash drive around.
But there is another side to the story.
The more files I keep on third-party platforms, the more I depend on somebody else’s infrastructure, account system, subscription and security practices. For personal documents, family photos, business files and other private information, I sometimes prefer having more direct control over where the data lives.
That is where a Network Attached Storage (NAS) device becomes interesting.
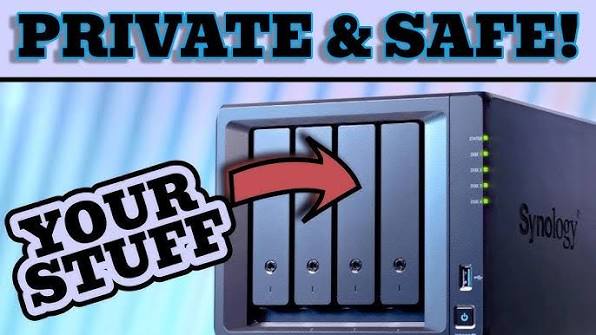
A NAS is basically a small computer designed primarily for storing and serving files over a network. Instead of keeping everything exclusively in Google Drive, OneDrive or another cloud service, you can keep a local copy at home and access it from computers and other authorized devices on your network.
In this guide, I will show you how to approach a home NAS setup, what hardware you need, how to configure storage, how to move your own or authorized files from another system, and how to secure the NAS properly.

What Is a NAS?
NAS stands for Network Attached Storage. Think of it as a dedicated storage computer connected to your router.
Rather than connecting an external hard drive directly to one laptop, the NAS connects to your home network. Your laptop, desktop, phone or tablet can then access the files according to the permissions you configure.
This makes a NAS particularly useful when several devices need access to the same files.
For example, you might have:
- Family photos and videos
- Personal documents
- School or university projects
- Your own business documents
- Website backups
- Creative projects
- Computer backups
- Media files
If you are already thinking about storage options, my guide on cloud storage versus USB drives explains why relying on only one storage method can be risky.
Why Build a Local Server Instead of Using Only the Cloud?

I would not describe a NAS as a complete replacement for cloud storage in every situation. Instead, I see it as another layer of control.
A local NAS can provide several advantages.
1. You control the physical storage
Your files are stored on drives inside a device that you control. You do not have to depend entirely on a monthly storage subscription for your primary copy.
2. Local transfers can be fast
When your computer and NAS are connected to the same network, moving large files can be much faster than uploading everything through an Internet connection.
This can be particularly useful if you regularly work with large videos, photographs or project files.
3. Multiple devices can access the same storage
You can create shared folders for different purposes and give individual users appropriate permissions.
4. You can automate backups
Many NAS systems can automatically back up computers and other devices. Synology, for example, provides tools for backing up computers to NAS storage.
5. You can reduce your dependence on one provider
If a particular cloud service changes its pricing or storage limits, your local storage remains available.
However, there is an important warning: a NAS is not automatically a backup.
If your NAS is the only place where your files exist and the drives fail, the data could still be lost.
What You Need to Build a Basic NAS
You do not need an expensive enterprise server to get started.
A basic setup consists of:
- NAS enclosure: A Synology, QNAP or similar NAS device.
- One or more hard drives: NAS-rated drives are generally designed for continuous operation.
- Network router: The NAS connects to your local network through the router.
- Ethernet cable: A wired connection is preferable for the NAS.
- Computer: You will use this to configure the NAS and transfer files.
- Backup drive: Ideally, keep another copy of important information somewhere else.
If you are building around an older computer instead of purchasing a dedicated NAS, you can also turn suitable hardware into a basic home server. However, a dedicated NAS usually provides a simpler management experience for beginners.
Step 1: Decide What You Actually Want to Store
Before buying anything, make a list of the files you want to manage.
For example:
- Personal documents
- Photos
- Videos
- Work files you are authorized to retain
- Website backups
- Computer backups
- Creative projects
This matters because storage requirements can become surprisingly large.
A person storing mainly documents may need relatively little capacity. Someone working with 4K video can consume hundreds of gigabytes very quickly.
If you are already running out of space on your phone, my article on why phone storage keeps filling up can help you identify files that may be better archived elsewhere.
Step 2: Choose the NAS Hardware
For a beginner, I would look at a two-bay NAS.
A two-bay model gives you room for two drives and can support redundancy configurations such as RAID 1, depending on the NAS operating system and drive setup.
RAID 1 mirrors data between two drives. If one drive fails, the other can continue holding the mirrored copy.
However, RAID is not a substitute for a backup. Accidental deletion, malware, theft, fire or other problems can affect both copies.
For more storage flexibility, a four-bay NAS gives you additional options, although the hardware and drives will cost more.
Step 3: Install the Drives
Install compatible drives according to the manufacturer’s instructions.
Once installed, connect the NAS to your router using Ethernet and turn it on.
At this stage, do not immediately expose the NAS to the public Internet.
QNAP specifically recommends connecting the NAS behind a router and warns against directly connecting the NAS to the Internet. Its security guidance also recommends disabling unnecessary UPnP, DMZ and port-forwarding configurations.
Step 4: Find the NAS on Your Network
Most modern NAS systems provide a setup utility or web-based discovery process.
From your computer, follow the manufacturer’s setup instructions to locate the NAS on your local network.
You will then create an administrator account and enter the basic network settings.
Do not treat the administrator password casually. It controls access to your storage, users and system configuration.
Step 5: Create Your Storage Pool
The exact terminology depends on the NAS brand.
You may see terms such as:
- Storage pool
- Volume
- RAID
- Shared folder
For example, with two drives, you might choose a mirrored configuration if your priority is keeping the NAS operational after a single-drive failure.
Remember that usable capacity can be lower than the combined advertised capacity of the drives.
Take some time to understand the storage configuration before putting important files on it.
Step 6: Create Separate Folders
Do not dump everything into one giant folder.
I recommend creating a simple structure such as:
- Documents
- Photos
- Videos
- Projects
- Backups
- Archive
You can then create separate users and permissions where necessary.
For example, if other members of your household use the NAS, they do not necessarily need administrator access.
Step 7: Create User Accounts
This is one of the easiest security improvements to make.
Create an administrator account for managing the NAS and ordinary accounts for people who only need access to files.
QNAP’s current security guidance recommends creating a new administrator account and disabling the default administrator account where supported. It also recommends strong passwords and two-step verification.
Do not share one administrator password with everybody.
Step 8: Transfer Your Authorized Files to the NAS
Now comes the part that most people are interested in: moving files from another storage location.
The safest approach is to transfer files that you own or have explicit permission to copy.
If you are moving files from your own cloud account, computer, external drive or an organization-approved storage location, download or copy the authorized files to your computer and then transfer them to the NAS.
For a large collection, organize the folders before beginning the transfer. This saves you from creating a massive mess that you will have to clean up later.
For example:
NAS
├── Documents
│   ├── Personal
│   ├── Business
│   └── Projects
├── Photos
│   ├── 2025
│   └── 2026
├── Videos
└── Backups
After copying the files, open several folders and verify that the files actually work.
Do not immediately delete the original copy just because the transfer appears to have finished.
Step 9: Verify Your Files Before Deleting the Old Copies
This is a step people often skip.
Suppose you transfer 500 GB of files and the computer reports that the transfer completed. That does not mean you should immediately erase the original data.
Open important documents. Check photographs. Play some videos. Compare folder sizes where appropriate.
For extremely important files, checksum or file-integrity tools can provide stronger verification.
Keep the original copy until you are confident that the NAS contains everything you intended to move.
Step 10: Configure Automatic Computer Backups
A NAS becomes much more useful when you stop treating it as a manually managed external drive.
Configure automatic backups from your computers where your NAS software supports them.
For example, Synology offers Synology Drive Client for backing up files and folders from computers to a NAS.
That means your important folders can be backed up automatically instead of relying on you to remember to copy them every Friday night.
Step 11: Turn On Snapshots If Your NAS Supports Them
Snapshots can provide restore points for files and folders.
That can be particularly valuable if a file is accidentally changed or malicious software modifies a large number of files.
QNAP recommends scheduled snapshots as part of its data-protection strategy and explains that snapshots can provide recovery points after ransomware incidents.
Configure a sensible retention policy so that snapshots do not consume all available storage.
Step 12: Secure the NAS Before Using It Seriously
This is probably the most important section of the entire guide.
A NAS is a network-connected computer. Treat it like one.
Use strong account security
Use strong, unique passwords and enable multi-factor or two-step authentication when your NAS supports it.
Keep the operating system updated
NAS manufacturers regularly release security updates. QNAP specifically advises users to install current firmware and application updates and provides security advisories for its products.
Do not expose the NAS unnecessarily
One of the biggest mistakes a beginner can make is opening ports on the router simply because they want to access the NAS from outside the house.
QNAP’s current security guide recommends avoiding direct Internet exposure and unnecessary port forwarding.
If you need remote access, use a properly secured method supported by your NAS manufacturer or a trusted VPN solution rather than casually exposing the NAS management interface to the Internet.
Disable services you do not need
If you are not using a particular service, consider turning it off.
Reducing unnecessary services reduces the number of things that need to be maintained and secured.
Step 13: Do Not Make the NAS Your Only Copy
This is where the idea of “ditching the cloud” needs some nuance.
I like local storage, but I would not recommend keeping the only copy of irreplaceable files on a NAS sitting beside your router.
CISA recommends maintaining multiple copies of important data and describes the 3-2-1 backup strategy: three copies of the data, on two different types of media, with one copy stored off-site.
Synology makes the same broader point: local backups are useful, but they do not protect against events such as theft, fire or other disasters affecting the location where the NAS is stored.
So a sensible setup might look like this:
- Copy 1: Your computer
- Copy 2: Your NAS
- Copy 3: External drive or another off-site backup
You can still use cloud storage as the off-site copy if that makes sense for your budget and privacy requirements.
What About Accessing the NAS From Outside Your Home?
Remote access is useful, but it increases the security requirements.
If you want to access your files while travelling, do not simply enable random router port forwarding and assume your password will protect everything.
Instead, investigate the secure remote-access options offered by your NAS manufacturer or use a properly configured VPN.
This is especially important if the NAS contains personal documents or sensitive business information.
If you are interested in general online security, you can also read our guide on cybersecurity in Nigeria for broader security practices.
Can a NAS Replace Google Drive or OneDrive?
Sometimes, but I would not automatically replace one with the other.
A NAS is excellent when you want control, local access and centralized storage.
Cloud storage is convenient when you need access from almost anywhere, collaboration, off-site redundancy or simple sharing.
For many people, the best solution is actually a hybrid setup.
Keep frequently used files on the NAS, maintain automatic backups, and keep an encrypted or otherwise protected off-site copy for disaster recovery.
That gives you much more resilience than relying on a single storage location.
My Recommended Beginner NAS Setup
If I were putting together a simple home setup, I would keep it straightforward:
- Two-bay NAS
- Two appropriately sized NAS-rated drives
- Wired Ethernet connection to the router
- Separate administrator and normal user accounts
- Strong passwords and MFA where available
- Automatic computer backups
- Snapshots where supported
- Regular firmware updates
- No unnecessary Internet exposure
- A separate backup copy stored away from the NAS
You can expand the system later as your storage requirements grow.
Final Thoughts: Is Ditching the Cloud Worth It?
I do not think the answer is to completely abandon cloud services.
Instead, I think it makes sense to understand where your data lives and decide which information deserves local control.
A NAS gives you a practical way to build your own private storage environment. You can centralize files, back up computers, organize photos and keep your personal data available across devices without depending entirely on one cloud provider.
However, owning a NAS also means accepting responsibility for security, backups, updates and hardware failures.
Most importantly, only transfer files that you own or have permission to manage. A NAS should give you more control over your legitimate data, not become a tool for taking confidential information from a company or another person’s account.
If you are serious about protecting important files, think beyond simply buying storage. Build a system: local storage + automatic backup + security + an off-site copy.
That approach gives you something better than simply “ditching the cloud.” It gives you a storage strategy that you actually control.
Useful Resources
For official security information, check the QNAP NAS Security Guide and Synology’s official backup guidance. You can also review CISA’s cybersecurity resources for broader data-protection advice.
If you enjoy practical technology guides, reviews, and digital business resources, visit the Infolandia Bookstore for more useful reading.
Editor’s note: NAS menus, features and security settings vary between manufacturers and software versions. Always follow the documentation for your specific NAS model, especially before changing RAID, storage-pool or remote-access settings.